recipes

Avocado Brownies - Recipe

Untitled design (5).png

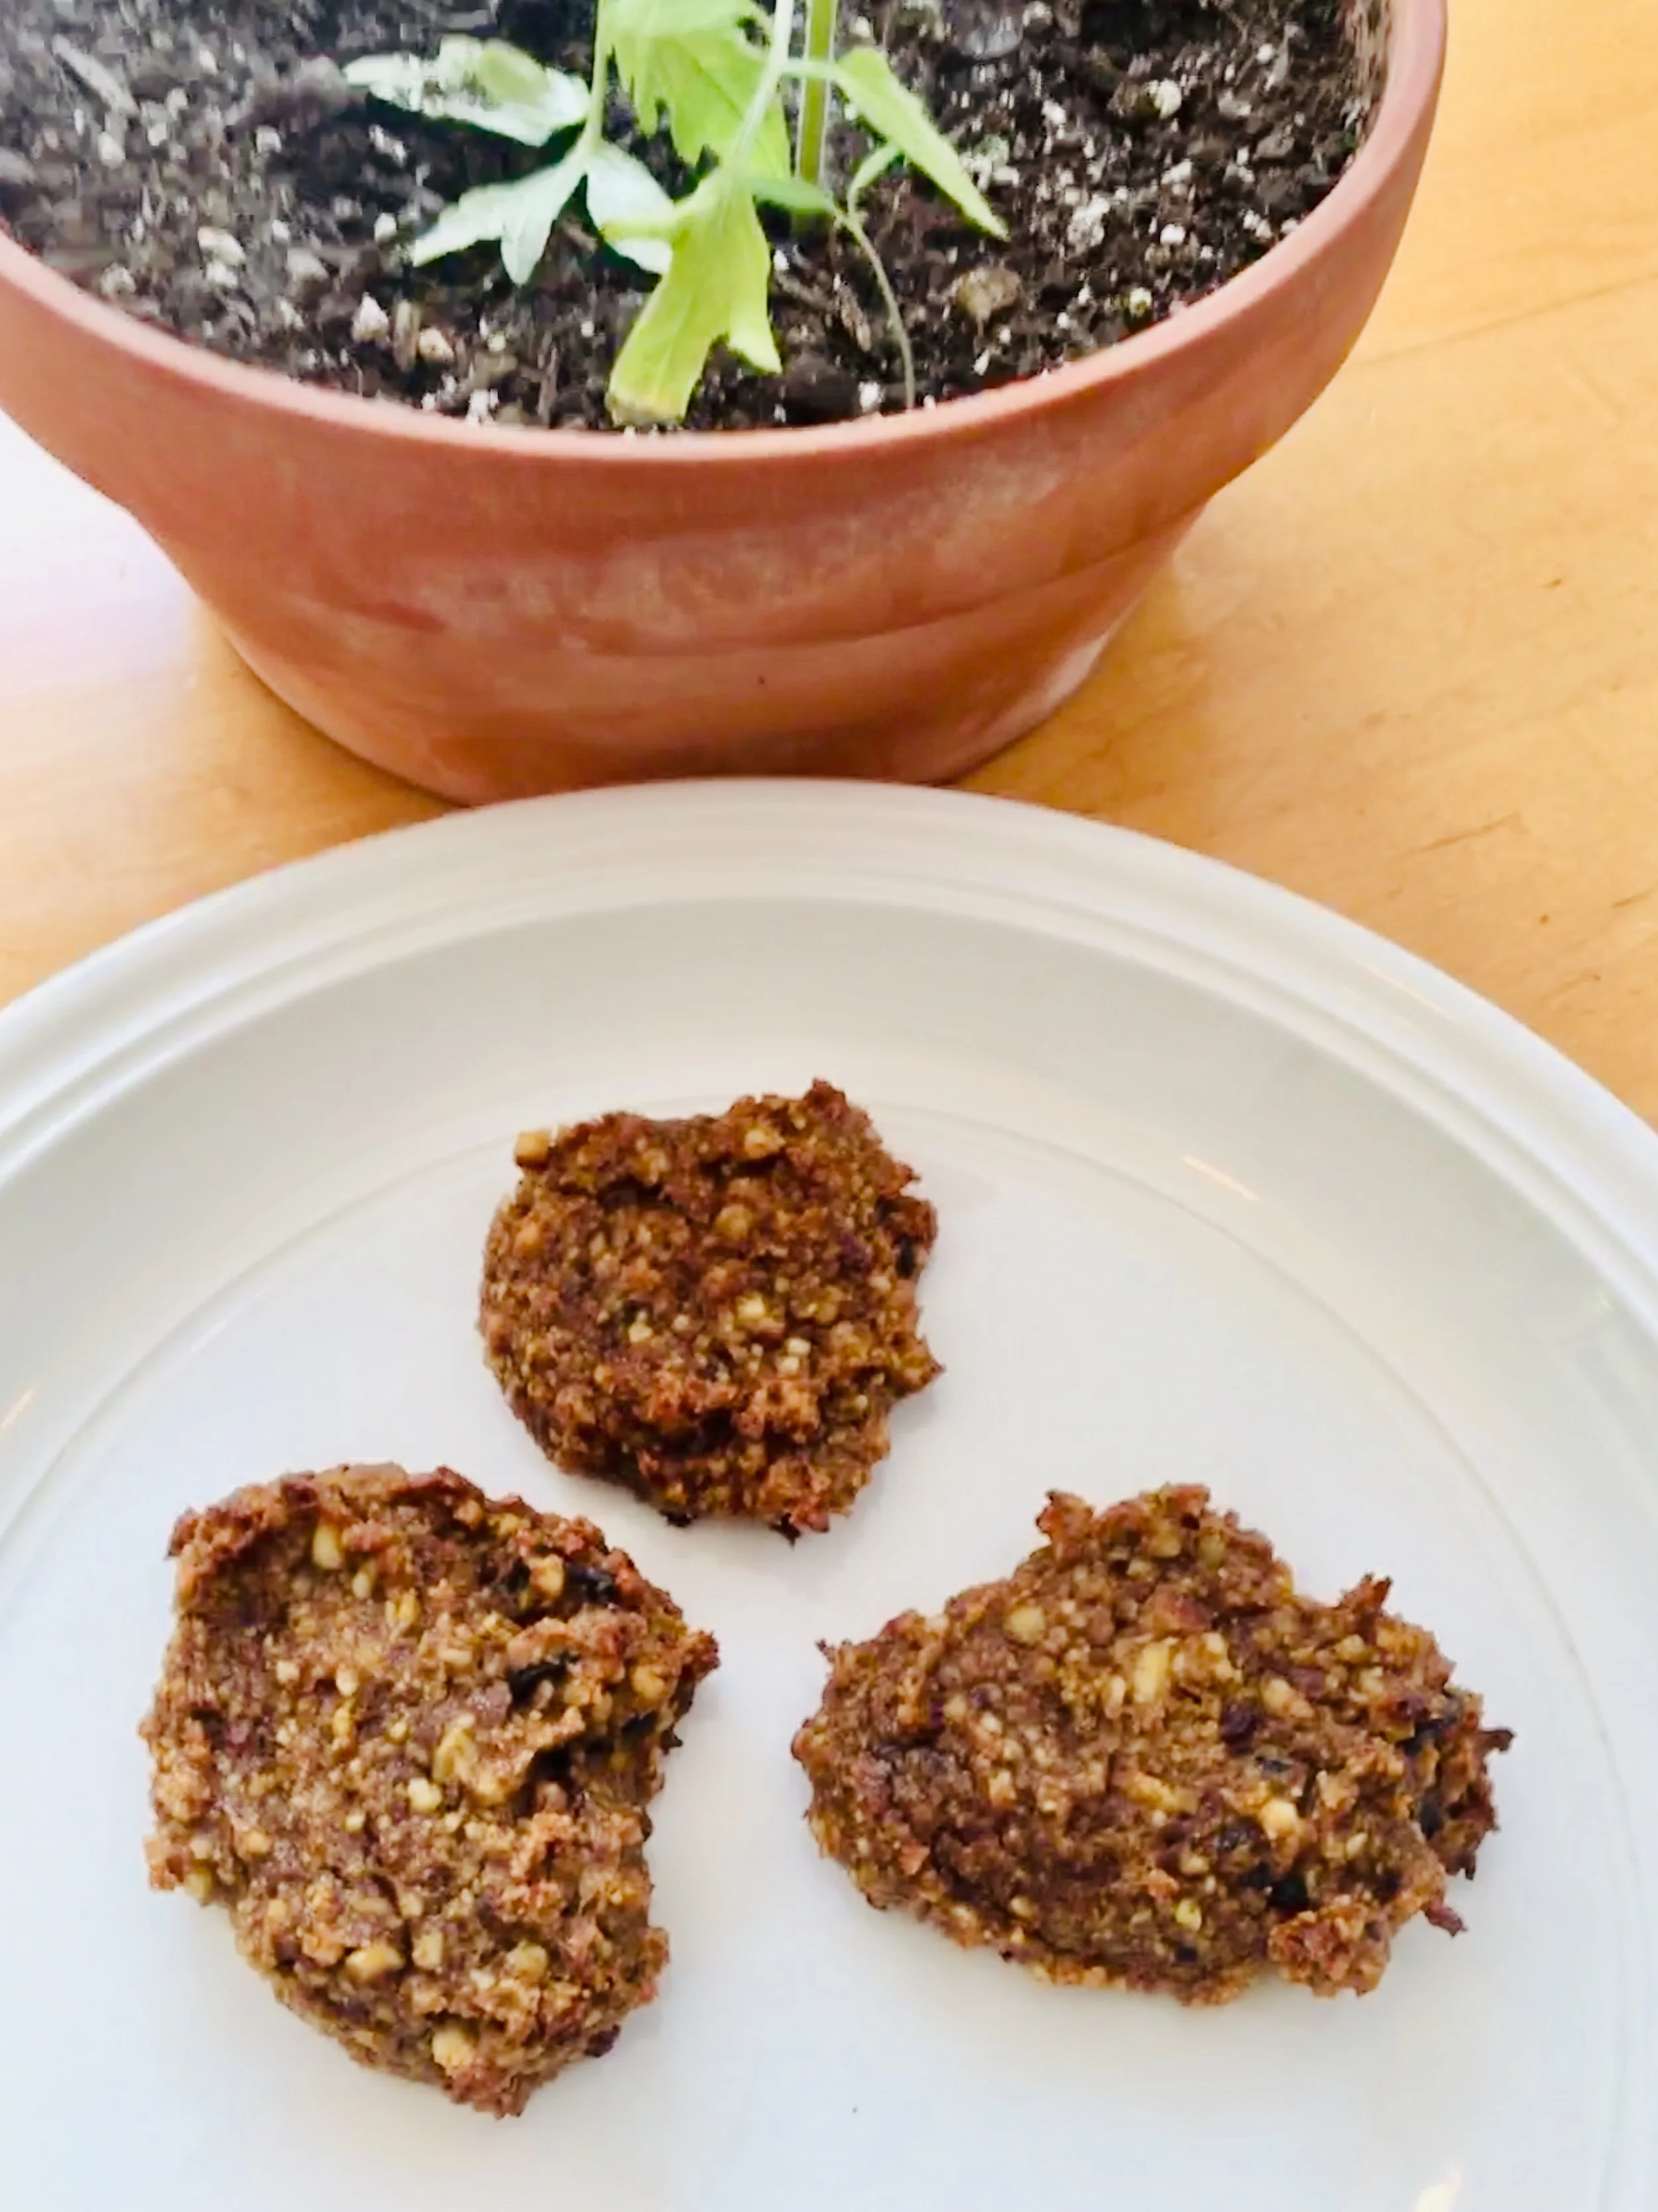
Have you ever added avocados to your baking? You should really give it a try, these brownies are delicious and you would never know that there is avocado in them (great for picky eaters!)

Adding avocado not only adds in a good amount of healthy fat to your baking, but also makes the texture of these brownies very soft and fluffy.

Check out the recipe below and if you give it a try, let us know what you think!

Serving = 12 brownies, (9x9in. pan)

Ingredients:

  • 1 ripe avocado

  • 2 eggs

  • 1/2 tsp vanilla

  • 1/2 cup coconut sugar

  • 3 Tbsp coconut oil or coconut butter (melted)

  • 1/2 cup almond flour

  • 1/2 cup cacao power (or cocoa powder)

  • 1 tsp baking soda

  • 1/2 tsp sea salt

  • 1/3 cup organic dark chocolate chips

Directions:

  1. Preheat oven to 350F

  2. Add first 5 ingredients into food processor & blend

  3. Add in remaining ingredients (excluding chocolate chips) and blend until smooth

  4. Stir in chocolate chips, leaving some for topping

  5. Line pan with parchment paper

  6. Pour batter in pan and smooth - top with remaining chocolate chips

  7. Bake 18-20 minutes

  8. Remove & let cool before cutting

  9. Enjoy !

Love pancakes? Check out our most popular recipe “Pancakes with Protein” by clicking HERE.

Energy Balls - Recipe

Untitled design (4).png

If I had to pick one of my favourite healthy and quick snacks to make it would definitely have to be the “energy ball” . I make all kinds of different combinations when it comes to making energy balls, it usually ends up being whatever I have in the cupboard at the time thrown together, but this recipe is one of my all time favourites.

These energy balls are made with two of my favourite adaptogens. What is an adaptogen you ask?

Adaptogens are natural substances derived from plants or botanicals that help the body adapt to stress, anxiety and fatigue. The adaptogens used in this recipe are maca and ashwagandha. Maca is a natural energy booster and is also great for balancing hormones. Ashwagandha is used for its calming benefits, it also helps reduce inflammation and improve your memory!

The other thing I love about these two adaptogens is that they are the easiest/most common ones to find in stores (especially in Cape Breton!)! You can check with your local health food store or bulk food store and they will most likely carry them. If not, you could get them on Amazon or online health food stores.

Check out the recipe below and if you make them, let me know your thoughts!

Ingredients:

  • 3/4 cup walnuts

  • 3/4 cup almonds

  • 8 dates (pitted)

  • 1/8 cup chia seeds

  • 1.5 tbsp coconut oil

  • 1/4 cup cacao powder

  • 1.5 tbsp raw honey

  • 1 tsp cinnamon

  • 1 tsp vanilla extract

  • 2 tbsp maca powder

  • 2 tbsp ashwagandha powder

  • 2 tbsp cacao nibs (optional, as these can be quite bitter)

Directions:

  • Soak dates in warm water for approximately 10 minutes to soften

  • While dates are soaking chop nuts and seeds in food processor

  • Strain water from the dates, add to processor and pulse until a dough-like consistency forms

  • Add the rest of the ingredients and pulse until well combined

  • Form into balls

  • Roll in cacao powder, unsweetened coconut or chopped nuts (this step is also optional)

  • Store in an air tight container in the fridge for up to 4 days

  • Enjoy !

If you are pregnant and/or lactating, it is advised to limit the use of adaptogens or avoid all together, if you wish to play it safe, you can still enjoy this recipe without the use of the adaptogens!

Do you love cookies? Check out this awesome recipe for “110% awesome cookies” HERE

Homemade Ice Cream - Recipe

Untitled design (3).png

Did you know that you can make ice cream at home without having to use an ice cream maker! Not only is it a healthier way to have ice cream (some call it “nice cream”) but you can also make what ever flavour you want, save money and involve the kids in the making process!

The base of this ice cream is made with bananas (no dairy here!). You can actually just make banana ice cream by chopping up a banana or two (or more depending on how many servings you want) freezing them and blending in a blender or food processor until it takes on the consistency of ice cream (approximately 3-5 minutes).

I have to admit, plain bananas is kind of boring (but good in a pinch when you don’t have much to add in), so here are a couple of options to make different flavours….

Mint-Dark Chocolate Chip Banana Ice Cream (a favourite of mine!)

  • 2 ripe bananas, sliced and frozen

  • 1/4 cup fresh mint (chopped)

  • 1/4 cup chopped organic dark chocolate

Chocolate Banana Ice Cream

  • 2 ripe bananas, sliced and frozen

  • 2 Tbsp organic cocoa powder

(optional - add in chopped chocolate or chopped nuts)

The directions are simple, make sure the banana is frozen, place all ingredients into food processor and blend (3-5 mins until smooth) If you want a more chunky texture add in half the ingredients and blend to get the flavour and then quickly blend the rest of the ingredients in to finish.

You can also store these in a glass storage container or a loaf pan. This is a great option if you are making a bigger batch and want to have some ready to go. Just store in the freezer and scoop out when needed.

Some other add-ins could be, any type of fruit, nuts, honey, spices (cinnamon, cardamom, etc) , any type of nut butter would work too (chocolate peanut butter banana ice cream sounds delicious!)

Give it a try and let us know what ice cream creations you came up with.

Enjoy !

Check out our recipe for the “perfect summer dipHERE

Strawberry Chia Jam

Looking for a healthier version of strawberry jam for all of those fresh local strawberries you have waiting to be used?

Check out this recipe for a refined sugar free, gelatin free & vegetarian (or vegan) friendly!

Strawberry Chia Jam:

Ingredients:

  • 2 cups Strawberries

  • 1 Tbsp Raw Honey (use maple syrup for vegan option)

  • 2 Tbsp Chia Seeds

Directions:

  1. Remove stems & wash strawberries

  2. Place all ingredients into blender/food processor. Pulse until you reach the desired consistency for your jam

  3. Put in sauce pan over medium heat until bubbling, reduce heat and let simmer for 10-15 minutes until it begins to thicken

  4. Remove from heat, pour into mason jar & let cool. Store in fridge for up to 7 days, if using later you can freeze it, just be sure to leave room at the top of the jar for expansion

  5. Enjoy !

Check out our Dairy Free, Gluten free “Cheesecake” recipe by clicking HERE.

Jill's Homemade Granola

IMG_6122.jpg

Granola is a favourite food at our house; however, I always struggle with the added sugar content in most commercially bought granolas. Enter the DIY tip of the year from my friend Jill. Jill had posted online that she had made some granola and that’s when I realized that by making my own I could ensure it had all the goodness and none of the stuff I didn’t like (genius!). Here’s Jill’s recipe (with modifications). Also, realize that I usually don’t measure when I cook, so these are approximate amounts, feel free to add more/less according to your preferences.

Ingredients:

  • 2 Cups raw almonds

  • 2 Cups raw cashews

  • 2 Cups raw pecans

  • 2 Cups raw qalnuts

  • 2 Cups raw macadamia nuts

  • 1 Cup raw sunflower seeds

  • 1 Cup raw pumpkin seeds

  • 1 Cup shredded, unsweetened coconut

  • 1 Cup quick oats

  • 4 Tablespoons coconut oil

  • 2 Tablespoons almond oil

  • 2 Tablespoons raw/unpasteurized honey

  • Dash of cinnamon

  • Dash of vanilla

  • 2 Tablespoons water

Directions:

  1. Preheat oven to 350F

  2. Chop each nut group into bite sized pieces (you can use a blender on chop settings, but I find something about chopping nuts to be very satisfying)

  3. Spread out all nuts and oats on a large, parchment-lined baking sheet

  4. Bake nuts for 10 minutes

  5. While nuts are baking combine coconut oil, almond oil, honey, cinnamon, vanilla and water in a small saucepan and bring to a short boil. Remove from heat and wait for the nuts.

  6. Remove nuts from oven and place into a large mixing bowl (they will be hot!) and add oil mixture and combine well.

  7. Turn oven off

  8. Place mixture back onto baking sheet and put the back into the oven for 10-15 minutes - BUT watch carefully - depending on the heat in your oven, you may need to remove earlier than 15 minutes. They should be a nice golden colour when finished.

Enjoy!

We like to have our granola with full fat yogurt and berries on top. The added fat content from the yogurt keeps you satiated for a long time.

Like this granola recipe? Check out our “Cinnamon Maple Pumpkin Seeds” recipe by clicking HERE

The Perfect Summer Dip

Fresh Herb Cashew Dip.png

During the summer months quick food options always seem a lot more appealing as opposed to spending hours in the kitchen cooking.

The more ways you can find to have less prep for my food in the summer, the more time you get to spend enjoying summer (it is the shortest season in Cape Breton!)

I am a lover of quick and healthy finger foods. This dip takes very little time to make, is full of nutrients & minerals from the fresh herbs and also a good way to put that herb garden to use !!

Ingredients:

  • 1/4 cup raw cashews

  • 1/3 cup unsweetened almond milk (or cashew milk)

  • 1/2 cup fresh basil leaves

  • 1/4 cup fresh parsley

  • 2.5 Tbsp fresh squeezed lemon juice

  • 1 clove garlic

  • 2 Tbsp red onion

  • 1/4 tsp sea salt

Directions:

  1. Soak cashews in warm water (enough to cover them) for 30 mins - drain water off when ready

  2. Add all the ingredients into a food processor or blender - blend for 3 minutes or until smooth

  3. Serve with sliced veggies like cucumber, peppers celery, carrot sticks etc. Seed crackers pair well with this dip as well (I like Mary’s Crackers)

  4. Enjoy!

**In this recipe the nuts are only soaked for 30 minutes to help soften the nuts which helps with the consistency of the dip. If you want to soak the nuts to break down the phytic acid and neutralize enzymes to help with digestion/absorption I would recommend soaking the nuts in water for 7 hours before you use them with filtered water, along with 1/4 tsp sea salt.**

I hope you get a chance to try this recipe out, if you do, leave a comment and let me know how you liked it!

Digging this dip? Check out our “Simplified Caesar Salad” recipe by clicking HERE

Simplified Caesar Salad Dressing

Finally, we are having some nice weather to enjoy all the summer things like barbecues and socials with friends and family. So, you know what that means…lots of salads loaded with store bought salad dressing!

Here are some reasons why you should ditch the bottled dressings and spend an extra 5 minutes making your own:

  • They are full of artificial flavours

  • They contain unnecessary sugars (like high-fructose corn syrup…who needs that on a salad… or ever?)

  • Bottled dressings are also made with tons of preservatives to prolong their shelf life … ever wonder why they don’t expire for 2 years?

  • These types of dressings are also loaded with trans-fat (the bad kind of fat!)

 All that being said, there are some bottled dressings you can buy with some clean ingredients and lower on the preservative side (these can be pretty pricey for a bottle though). The bigger picture here is that if you are making a dressing from scratch it’s going to 1. Taste better not only because its super fresh but also because you made it yourself (isn’t that always the way!) 2.  You don’t have to have 10 bottles of half used dressing in your fridge for years and years and years…you get the point. If you make your own, you can make as much as you need and there is no waste! 3. You can control the ingredients you put in your dressing, if there are any dietary restrictions or allergies this is the perfect way to know exactly what you are getting!

 The recipe for this salad dressing is a Caesar style dressing, its light, healthy and full of flavour!

 Caesar Salad Dressing:

Ingredients:

1/3 cup plain Greek yogurt

1 clove of Garlic

2 tablespoons Apple Cider Vinegar

1 tablespoon Tamari (or coconut aminos)

1 tablespoon Extra Virgin Olive Oil

1 tsp Dijon Mustard (I like to use an organic brand and make sure it is free of canola oil)

Sea Salt & Pepper to taste!

Directions:

Put all ingredients in a food processor, blend until smooth. You can also use an immersion blender or even a regular blender! If you don’t have any of those, make sure the garlic is minced well and whisk all ingredients together and let stand for a few minutes before using to make sure all the flavours come together.

Enjoy & happy BBQ’ing!

Like this dressing? Check out our “Perfect summer dip” recipe by clicking HERE.

110% Awesome Cookies

Paleo, Gluten Free, Dairy Free 110% AWESOME Cookies!

I’ve been struggling to find a decent recipe for a “healthier” cookie. Usually modifications to recipes in the attempt of making them a little “healthier” don’t turn out very well. But this time I’ve hit the jackpot! These cookies are not only ridiculously delicious, but they are decent in protein, fibre, vitamin E, vitamin C, iron, magnesium and potassium! Needless to say, they did not last long at our house!

Ingredients:

  • 1 Cup Dates

  • 1 Cup Ras Cashews

  • 1 Large Egg

  • 1 Tsp Vanilla Extract

  • 1/4 Cup Almond Flour

  • 1/4 Tsp Baking Soda

  • 1/4 Tsp Salt

  • 1/4 Cup Chopped Almonds

  • 1/4 Cup Chopped Macadamia Nuts

  • 1/4 Cup Unsweetened Coconut Flakes

  • *Optional 1/4 Cup 70% Dark Chocolate Chunks

Instructions

  1. Soak cashews and dates in boiling hot water for 5 minutes.

  2. Preheat oven to 350 F.

  3. Chop almonds and macadamia nuts and set aside in medium sized bowl.

  4. Remove dates and cashews from water, shake dry and pulse in bender till chopped/mixed well.

  5. Add egg, vanilla, coconut flour, baking soda and salt into blender and process until barely chunky.

  6. Add mixture into bowl with almonds and macadamia nuts, add coconut flakes mix well.

  7. *Optional add in - add dark chocolate chunks to mixture (our little guy does not like chocolate, so I divided the mixture into two and then added chocolate to half).

  8. Place table spoon sized portions onto parchment lined baking sheet, about 1 inch apart. Gently pat down, these cookies do not spread at all.

  9. Bake fore 11-12 minutes. Removing from oven, letting the cookies stay on the baking sheet for 2 minutes before transferring.

Do you have a bit of a sweet tooth? Check out our “Chocolate Zucchini Blender Muffins” by clicking HERE

Gluten Free, Dairy Free "Cheesecake"

Dairy Free "Cheesecake"

I've had my eye on this recipe for awhile and I thought Christmas would be the perfect time to try it out.  I can't even start to explain how good this "cheesecake" was!  Every single person that tried it said it was remarkable!  Here are what some people are saying:

  • "This is really really good -what is the crust made out of?" Keith (gluten intolerant)

  • "It was SOOOOOO good" Jen G. (supermom)

  • "DOOD" aka "Good" Ethan, (age 1)

I adapted the recipe from the Helmsley and Helmsley cookbook we got last year for Christmas.    It was the easiest thing on earth to make and it's jam packed with nutrients! 

Needed:

  • 1 cup pecans

  • 7.5 tablespoons shredded unsweetened coconut

  • 9.5 tablespoons cocao nibs (found them at superstore and at bulk barn)

  • 1 cup pitted dates

  • 9 tablespoons raw honey

  • 3 tbsp coconut oil (melted) for base

  • 5-6 ripe avocados

  • 3/4 cup lime juice

  • 1 tsp lime zest

  • 3/4 cup coconut oil (melted) for the filling

  • stevia to taste

  1. Pre-heat oven to 300 degrees F - When heated, toast the pecans and coconut on a baking tray for about 7-10 minutes, until coconut is golden.

  2. Line the base (and sides if you wish) of a springform or loose-bottomed 7 inch round cake tin with parchment paper.

  3. Put the pecans, coconut, cocao nibs, pitted dates and 3 tbsp coconut oil in blender/food processor and blend until mixture is crumbly but still holds together, keeping a little crunch is a nice touch.

  4. Fill the bottom of your tin with the base mixture and press it down tight with the back of a spoon - making sure it is even on all sides. Let the base cool in the fridge while you prepare the filling.

  5. Put the peeled avocados, lime juice, lime zest, raw honey, 3/4 cup coconut oil, and stevia in the blender/food processor and blend until smooth and silky. The more coconut oil you use the thicker your cake will become. Check for taste and add more lime juice, honey or stevia based on your preference for sweet vs. tart. (to be honest I used barely any stevia when I made mine).

  6. Pour filling in the cake pan, cover the top and return to fridge for at least 4 hours or let rest overnight.

  7. Before serving carefully remove cake from pan - you may need to run a knife around the edges before removing cake.

  8. Enjoy!

Ps - I thought a little bit of drizzled dark chocolate, or toasted coconut could make a nice addition to the cake - but it's pretty perfect as it. 

P.Ps - You could use this base for any other type "non-bake" cakes too - it was seriously that good. 

Did you like this recipe? Check out another healthy option HERE!

Lobster Coconut Noodle Soup

Lobster Coconut Noodle Soup

With Lobster season in full swing, here's a good way to use up your leftover lobsters (if there are any!).  It's a nice, quick and healthy option for those who always feel a little guilty with the full cream in traditional lobster chowder. Give this recipe a try, it might just become your new go to for lobster the next day!

Cooking time - about 20 minutes if you lobsters are cooked and shelled in advance.

  • 3 cups vegetable stock

  • lobster Shells

  • 2 cloves garlic

  • 400ml full fat coconut milk (1 can)

  • 2 tablespoons Thai red curry paste

  • 1+1/2 tablespoon fish sauce

  • 1/2 lime

  • 2 stalks lemon grass chopped (use the lower 1/3)

  • 2 chopped carrots

  • 5 quarterted mushrooms

  • 1 small handful of rice noodles - I used thick ones, but vermicelli type noodles would probably work well too

  • cooked lobster meat - I used 4 tails and 8 claws, in bite sized pieces

  • cilantro

  1. Bring the stock, garlic and shells to a boil. Reduce heat to min. Remove the shells and garlic

  2. Add 1 can of coconut milk, fish sauce and thai red curry paste, whisk for 1 minute.

  3. Add carrots and lemongrass.

  4. While that is cooking, in a shallow pan, boil water for noodles. Once water is boiling, add noodles and let them boil only for a very short time (like less than a minute). Dump hot water and let noodles sit in cold water.

  5. Add lime and mushrooms. Increase heat to medium (not quite boiling)

  6. Add lobster and noodles.

  7. Serve with cilantro garnish.

With no Thai restaurants in Sydney, I modified a Tom Kai Gai recipe just a little, the results were fantastic!  You can opt for no noodles in this dish. When I make this the next time, I think I will add some celery and maybe some bamboo shoots.

There is quite a bit of salt in the stock, so you probably won't need to add any into the soup.  We were serving this to our little office manager, so it was less spicy than we would normally serve. You can add a small dash of scriacha if you want to liven things up - but give this a go first, it is a very flavourful soup as is.

You can opt to go with "lite" coconut milk, but I find "lite" to be very watered down and less flavourful. Live a little, go with the full fat coconut milk....

It's kinda sad that we needed a nice hot soup on such a cold day in July.  Oh summer, I feel like you are just playing games with us.... will you ever really show your face?

Love Soup? Check out this recipe for “Roasted Butternut Squash and Tomato Soup” recipe by clicking HERE.

JMM

Healthy Soup for Dinner!

Roasted Butternut Squash and Tomato Soup

Here's an easy and healthy option for dinner tonight!

  • 2 medium sized butternut squash

  • 1 large can diced tomatoes (fresh if you have them)

  • 1 small onion

  • 6-10 roasted garlic cloves

  • Bone broth (homemade if you can...) - amount depends on how thick you like your soup

  • Coconut oil or olive oil

  • Salt & Pepper to taste

  • Dried basil

  1. Slice the squash and remove the seeds and place onto a baking pan

  2. Dice the onion and place into the hollowed squash, leave the garlic wrapped and place onto the baking pan with the squash and onions

  3. Using olive oil or coconut oil - coat the squash with oil and mix a touch of oil in with the onion

  4. Bake the squash, onion and garlic at 350-400 for around an hour (squash will be soft to pierce with fork)

  5. Remove the skins of the squash

  6. In a pan warm the coconut oil and sauté the tomato for 20 minutes then let cool

  7. Let the vegetables cool so that you can work with them without burning yourself. Mix all the vegetables in a blender and blend until smooth. You may have to add 1/4-1/2 cup of bone broth into the blender to help liquify the vegetables.

  8. In a large pot add the vegetable mixture and bone broth. We added about 2.5 cups of broth, which gave us a soup with a consistency thicker than broth but thinner than baby food.

  9. Bring pot to a gentle bubble, adding salt, pepper and basil to taste

  10. Enjoy!

This soup had a nice blend of sweet and savoury!

** A pinch of dried chillies might compliment this soup nicely.  We did not add any chillies as our little office manager will be eating this soup for the rest of the week!

The soup is pictured with a small glass of fresh-squeezed non-pasturized  orange/pineapple/raspberry juice and two small pieces of fresh baked olive loaf (both from Superstore... I wish I was that kind of supermom!!)

Love soup? Check out this amazing recipe for “Slow Cooker Sausage and Kale Soup” by clicking HERE.

A little antioxidant relief for your holiday indulgence

While we are strong advocates of living a life of moderation, we understand how hard it is to avoid overindulging during the holidays.  Here's a great little recipe to help you recover from the holiday "cheer"!

Antioxidant Smoothie

  • 1 cup almond or coconut milk

  • 1/2 cup frozen pineapple or mango chunks

  • 1 fresh banana

  • 1 tablespoon coconut oil

  • 1/2 - 1 teaspoon turmeric

  • 1/2 teaspoon cinnamon

  • 1/2 teaspoon ginger

  • 1 teaspoon chia seeds

Blend ingredients.  Pour in glass. Enjoy.

Turmeric is mostly known as a spice used in curries.  But did you know that it is believed that turmeric (and curcumin that is a component of turmeric) are well known for their antioxidant and anti-inflammatory properties. 

Curcumen works to neutralize the free-radicals that float through our bodies.  Free-radicals are unstable molecules (missing an electron) that wreck havoc on the body.  Also, curcumin behaves like an NSAIDs (such as ibuprofen/Advil  or naproxen/Aleve ) by blocking the COX-1 & COX-2 enzymes in the body - thus stopping the transmission of a pain signal. 

While it is unknown how much turmeric must actually be consumed on a daily basis, adding a little to your shake on a regular basis can help with keeping you healthy this holiday season!


Eggnog alternative for the holidays

Eggnog is a holiday tradition that is often laced with hidden sugars and empty carbs/calories. 

Here's a tasty option that will help hit the craving, but save you on the guilt! (alcohol free)

Prep time: 5 minutes Cooking time: 10 minutes

INGREDIENTS

  • 1 cup coconut milk (full fat coconut milk will make it creamier and more satiating, but you can use low fat if it will make you feel less guilty)

  • 1 cup dairy-free milk (such as unsweetened almond or coconut - watch out for the hidden soy in dairy-free milk)

  • 1-2 tablespoon maple syrup (to taste preference)

  • 1/2 teaspoon powdered stevia extract (if needed to taste preference)

  • 3 egg yolks

  • 1 teaspoon vanilla

  • pinch sea salt

  • pinch freshly grated nutmeg (to taste preference)

INSTRUCTIONS

  1. In a bowl beat egg yolks until lighter in colour.

  2. Add in syrup and stevia and whisk well - set aside.

  3. In a separate saucepan combine the milks, salt, and nutmeg and bring the mix to a boil, stirring occasionally.

  4. Remove the pan from the heat, and slowly add it into the egg/sugar mix, stirring continuously.

  5. Return everything to the pot, stirring continuously, and heat to a medium setting or about 1-2 minutes - going to high or long with the heat will potentially make the mixture curdle. Keep stirring the pot at this point! Remove from the heat after a minute or so.

  6. Add in the vanilla.

  7. Chill and serve!