Simple Ways To Reduce Your Plastic Usage!

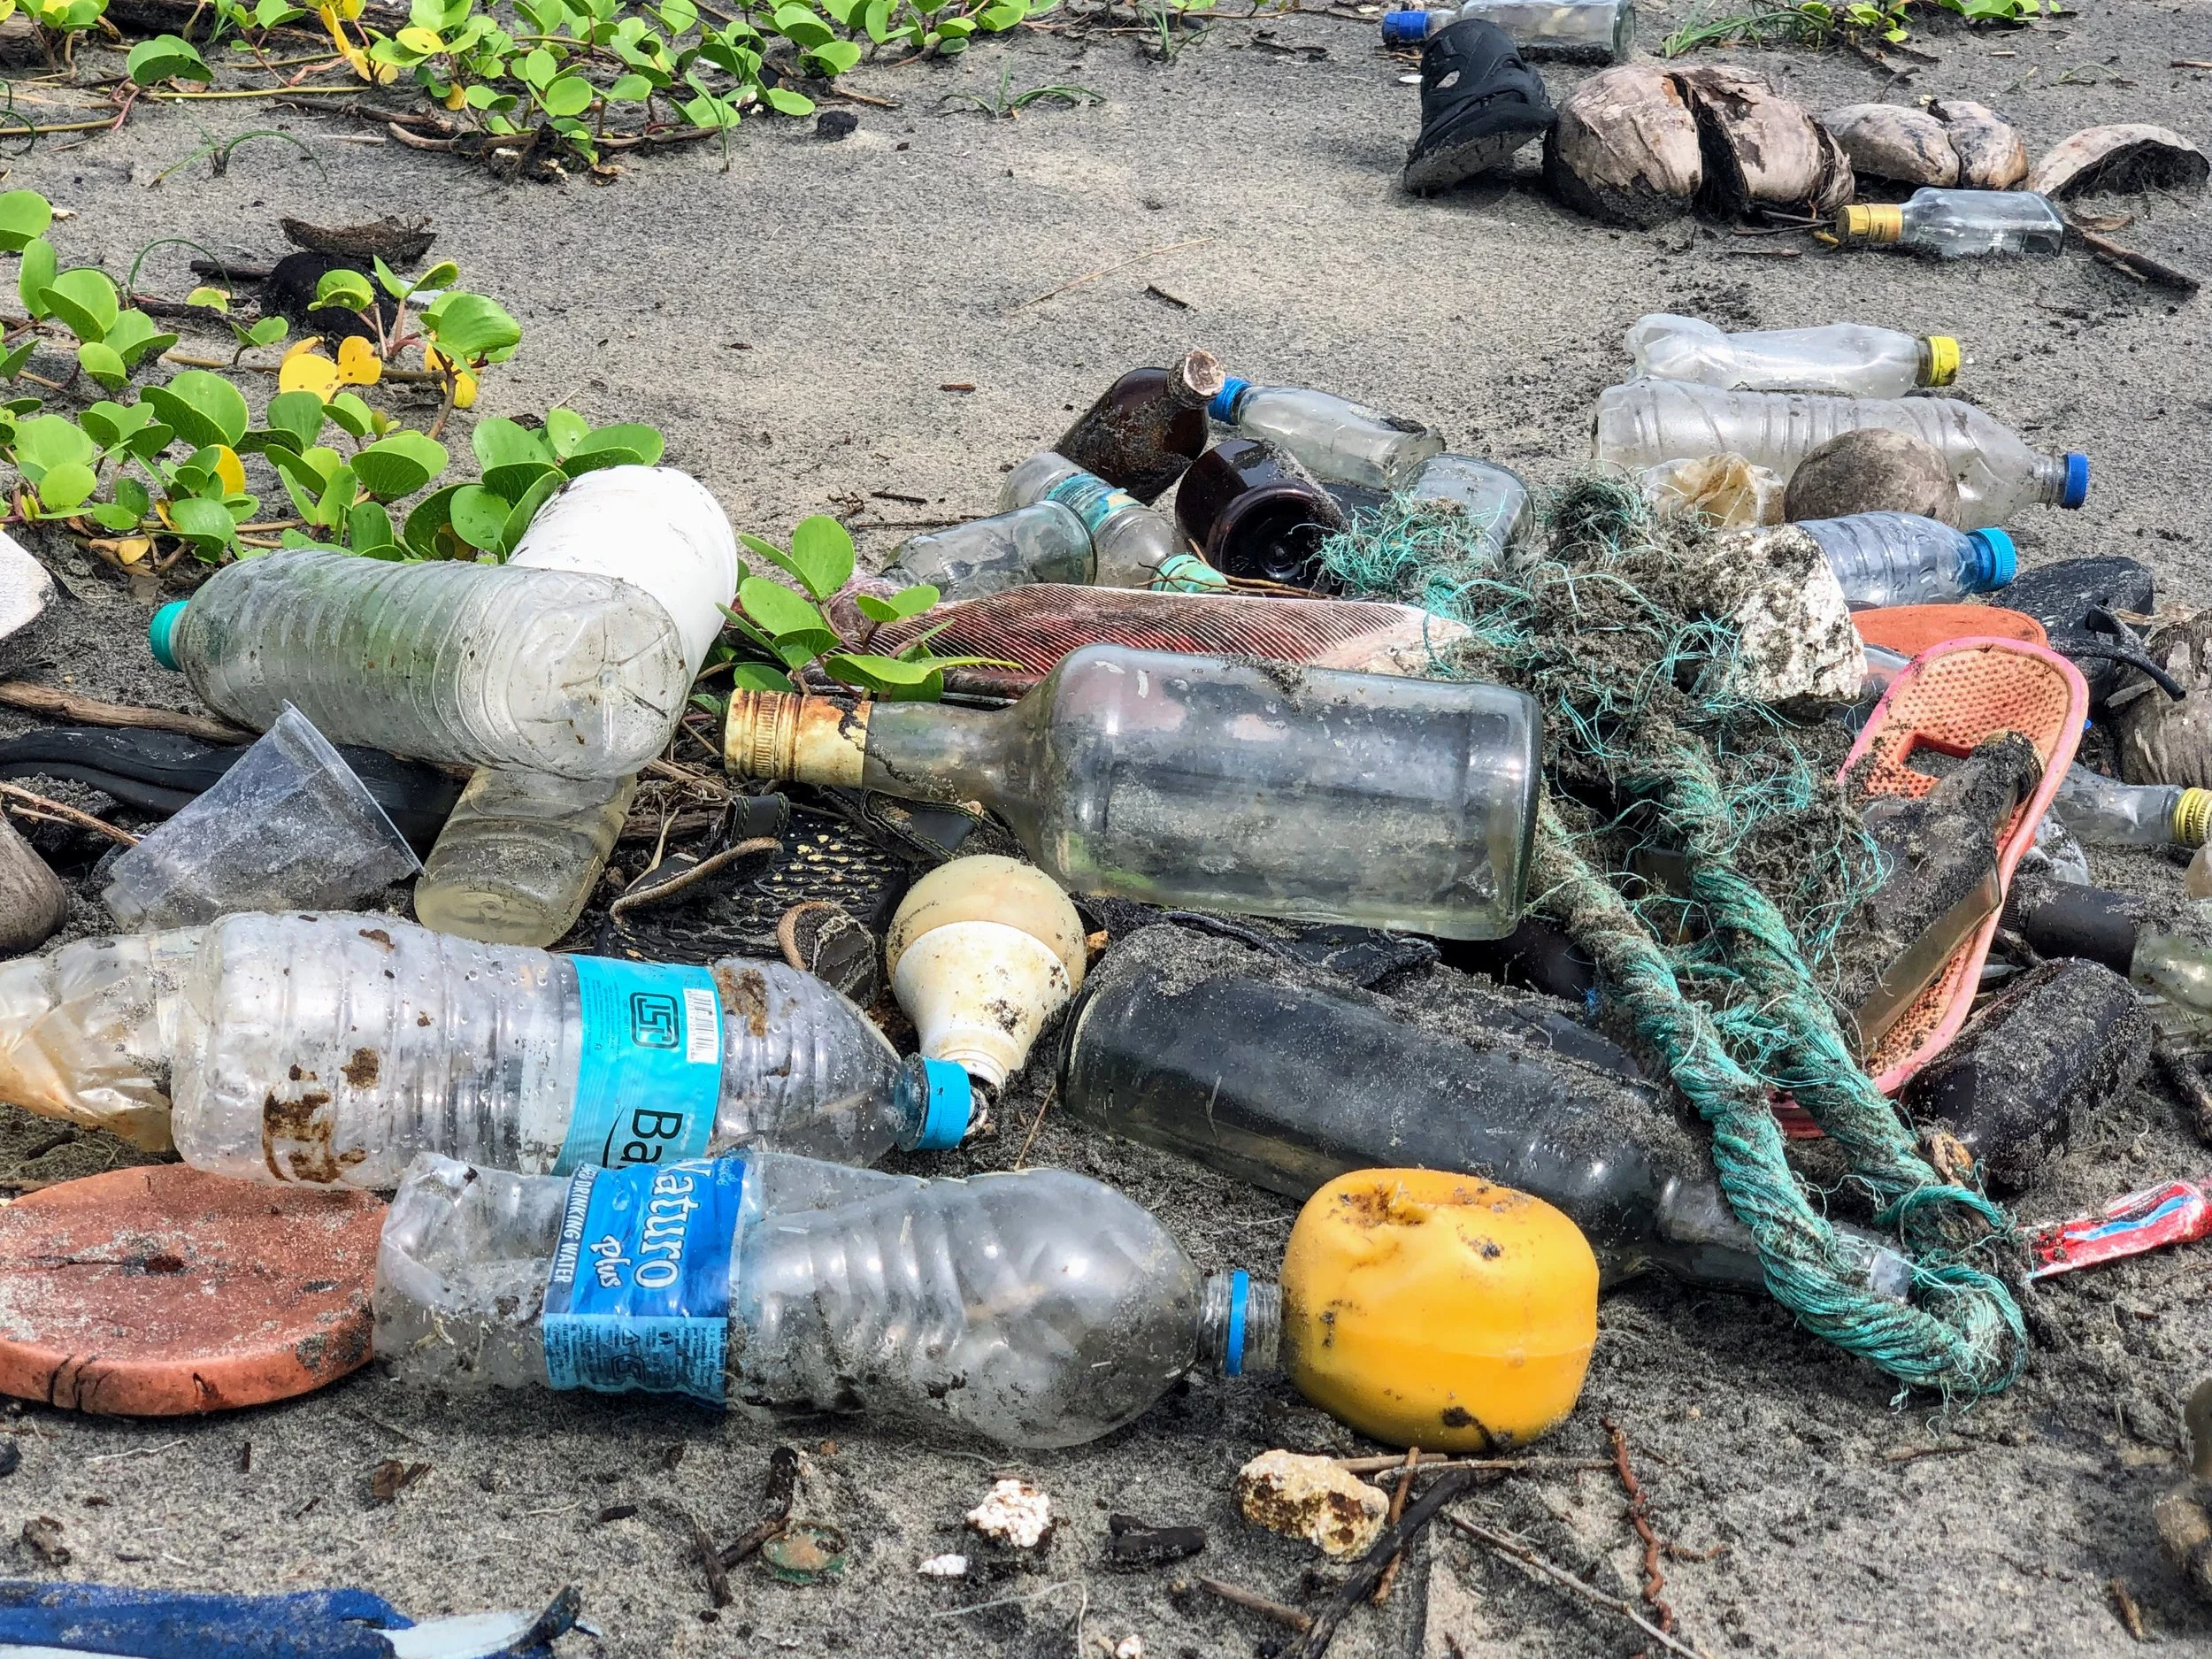
If you don’t already know…plastic is ruining our eco-systems (specifically microplastics). They have also recently been found in the air we breathe and even rain !!

Microplastics are basically tiny pieces of plastic that comes from larger plastic products that disintegrate. They can come from exfoliants (microbeads = not good!), food containers, clothing and many more products.

These are some ways that you can reduce the use of plastic in your daily life:

  1. Stop using straws. If it is a must at a restaurant, ask if they have a paper option or invest in your own metal or silicon straw to take with you. (these usually come in bulk and are very affordable)

  2. Ditch the plastic produce bags at the grocery store. These bags are great, store them with your reusable grocery bags so you have them with every trip you make to the grocery store.

  3. Packing lunch/leftovers in glass or ceramic containers is better for the environment and your health. Heating up food in plastic containers is not recommended (this is a whole other blog all together…stay tuned for that one!)

  4. Use reusable snack bags to pack snacks on the go. I really like this brand of bags. They come in all different sizes as well, anything you would use a plastic bag for (even freezer bags) this is a great option.

  5. Get rid of the plastic wrap! Another kitchen “staple” that can be banished for good! I LOVE beeswax wrap. Not only is it eco-friendly, it keeps food fresh for much longer than plastic wrap.

  6. Buy anything you can in bulk and reuse containers to reduce packaging waste.

  7. If going to a restaurant, bring your own containers for taking leftover’s home instead of using their plastic or styrofoam containers.

  8. Thrift shopping is very eco-friendly and reduces the amount of clothing in landfills. When purchasing new clothes or fabric products, look for brands that are made with cotton, linen, hemp and wool.

  9. Use a reusable cup when ordering your daily coffee or tea and try and remember to use a reusable (preferably metal or glass) water bottle.

  10. Last but not least, this one is simple…stop purchasing plastic stuff!


We could go on and on about this, there are SO many ways to reduce your plastic usage. The most important part is being aware of the issue and then implementing the steps to help reduce how much plastic we are using. The numbers are big, and it may seem “useless” because you are “only one person”, but if everyone takes the initiative to reduce how much plastic we are using, then hopefully by 2050 our oceans won’t contain more plastic than fish!


Check out the links in the post for more info about microplastics. Also, i posted this link on our Facebook Page but I will post it here as well. It is a video and some info about plastic in our oceans, there is a lot of really great info in here to share with others.


Avocado Brownies - Recipe

Untitled design (5).png

Have you ever added avocados to your baking? You should really give it a try, these brownies are delicious and you would never know that there is avocado in them (great for picky eaters!)

Adding avocado not only adds in a good amount of healthy fat to your baking, but also makes the texture of these brownies very soft and fluffy.

Check out the recipe below and if you give it a try, let us know what you think!

Serving = 12 brownies, (9x9in. pan)

Ingredients:

  • 1 ripe avocado

  • 2 eggs

  • 1/2 tsp vanilla

  • 1/2 cup coconut sugar

  • 3 Tbsp coconut oil or coconut butter (melted)

  • 1/2 cup almond flour

  • 1/2 cup cacao power (or cocoa powder)

  • 1 tsp baking soda

  • 1/2 tsp sea salt

  • 1/3 cup organic dark chocolate chips

Directions:

  1. Preheat oven to 350F

  2. Add first 5 ingredients into food processor & blend

  3. Add in remaining ingredients (excluding chocolate chips) and blend until smooth

  4. Stir in chocolate chips, leaving some for topping

  5. Line pan with parchment paper

  6. Pour batter in pan and smooth - top with remaining chocolate chips

  7. Bake 18-20 minutes

  8. Remove & let cool before cutting

  9. Enjoy !

Love pancakes? Check out our most popular recipe “Pancakes with Protein” by clicking HERE.

Capture Cape Breton Finalists 2019

Capture Cape Breton Finalists

Thank you to everyone who entered! We had over 100 entries for the contest and you have no idea how hard it was to choose only six - so we are adding two wild card entrants! That’s right, 8 people have qualified for the finals!

Here are the EIGHT finalists for our Capture Cape Breton contest. 

The winner will receive a free massage every month for the rest of 2019! 

Vote via Facebook or Instagram, please only one vote per social media account. 

Voting closes at midnight on August 30th 2019.  

Here’s a closer look at our finalists. 

IMG_6748.JPG

1.Iona

Katherine Macleod

IMG_6736.JPG

2. Lighthouse

Etienne Frechette

IMG_6732.JPG

3. Mira River Full Moon

Laura Marie

IMG_6744.JPG

4. Kid Jumping

Michelle Lundrigan

IMG_6737.JPG

5. Barachois River

Shirley Campbell

IMG_6734.jpg

6. Charles on Branch Pond Look off

Sylvia Dove

IMG_6739.JPG

7. Kennington Cove

Christiane Kennedy

IMG_6740.JPG

8. West Mabou Beach

Stephanie MacPherson

Take a look at the fine print:

  • entrants must like our Facebook page/follow us on Instagram (this is so we can tag YOU)

  • entry must be a picture of Cape Breton that YOU took - it can be from a "real camera" or a phone, but you must be the photographer

  • winner will receive a complimentary massage on a Monday or Tuesday every month (starting in September) for the rest of the year

  • massages must be booked in advance and cannot be sold to somebody else (but can be gifted)

  • prize does not include massage therapist gratuity

  • massages must be claimed by the same person

  • by entering you are giving us permission to use your picture on our website and social media pages

Energy Balls - Recipe

Untitled design (4).png

If I had to pick one of my favourite healthy and quick snacks to make it would definitely have to be the “energy ball” . I make all kinds of different combinations when it comes to making energy balls, it usually ends up being whatever I have in the cupboard at the time thrown together, but this recipe is one of my all time favourites.

These energy balls are made with two of my favourite adaptogens. What is an adaptogen you ask?

Adaptogens are natural substances derived from plants or botanicals that help the body adapt to stress, anxiety and fatigue. The adaptogens used in this recipe are maca and ashwagandha. Maca is a natural energy booster and is also great for balancing hormones. Ashwagandha is used for its calming benefits, it also helps reduce inflammation and improve your memory!

The other thing I love about these two adaptogens is that they are the easiest/most common ones to find in stores (especially in Cape Breton!)! You can check with your local health food store or bulk food store and they will most likely carry them. If not, you could get them on Amazon or online health food stores.

Check out the recipe below and if you make them, let me know your thoughts!

Ingredients:

  • 3/4 cup walnuts

  • 3/4 cup almonds

  • 8 dates (pitted)

  • 1/8 cup chia seeds

  • 1.5 tbsp coconut oil

  • 1/4 cup cacao powder

  • 1.5 tbsp raw honey

  • 1 tsp cinnamon

  • 1 tsp vanilla extract

  • 2 tbsp maca powder

  • 2 tbsp ashwagandha powder

  • 2 tbsp cacao nibs (optional, as these can be quite bitter)

Directions:

  • Soak dates in warm water for approximately 10 minutes to soften

  • While dates are soaking chop nuts and seeds in food processor

  • Strain water from the dates, add to processor and pulse until a dough-like consistency forms

  • Add the rest of the ingredients and pulse until well combined

  • Form into balls

  • Roll in cacao powder, unsweetened coconut or chopped nuts (this step is also optional)

  • Store in an air tight container in the fridge for up to 4 days

  • Enjoy !

If you are pregnant and/or lactating, it is advised to limit the use of adaptogens or avoid all together, if you wish to play it safe, you can still enjoy this recipe without the use of the adaptogens!

Do you love cookies? Check out this awesome recipe for “110% awesome cookies” HERE

Exercise Class Schedule

Fall is like the second coming of New Year’s resolutions. It’s a time to revisit goals, get rid of bad habits and start some healthy routines. Here is our fall exercise class schedule:

Tuesdays @ 1pm

  • “Sweat and Play”, Play Palace - 4-weeks $40 or $15 per drop in class. Kids/babies get supervised play time while mom gets a great workout!

  • Starting September 10th

Wednesdays @ 10am

  • 55+ Exercise class, Our Lady of Fatima Church - 6-weeks $30 or $7 per drop in class. This class focuses on strength, endurance, mobility and balance. Participants of all levels and abilities welcome!

  • Starting September 11th

Thursdays @ 10am

  • Strength and Mobility with Dr. Shaun, Southend Community Center - 6-weeks $30 or $7 per drop in class. Dr. Shaun focuses on movements for healthy aging.

  • Starting September 12th

Fridays @ 10am

  • Chair Yoga with Jaime, Our Lady of Fatima Church - 6-weeks $30 or $7 per drop in class. Many of the poses of a traditional Yoga class are performed using a chair to assist those who may have mobility or balance challenges.

  • Starting September 13th


What Exactly Is A Private Yoga Session?

When you book a private Yoga session, you are getting a practice that is made specifically for you and your own needs, this looks different for everyone. Below I have outlined a few of the more common reasons people attend Private Yoga Sessions and what to expect:

  • Looking for a private class because you can’t make it to a scheduled class? Let us know when you book your session. Once you show up for your session you will be guided through a 45 minute session in the Yoga style you wish to practice (this is can be decided on the day of the session as our mindset is always changing, you might want something for energy or maybe something to help with relaxation at the end of a long day. During the 45 minutes you will be one-on-one with the instructor who will help you with proper alignment and can also work with you on any personal goals you might have within your practice you wish to achieve.

  • Some people look to Yoga as a healing modality when dealing with chronic or acute conditions. More and more health practitioners are realizing the healing benefits of Yoga and mindfulness practices for many health related issues.

  • If you are wanting to learn more about how Yoga can specifically help you improve the health of your body & mind, this is another way a Private Yoga Session could be helpful. You can come and talk to the instructor, she will go over any important information needed. Based on what you talk about, a home practice composed of specific Yoga poses will be made and given to you to take home and practice. Our instructor will also go over each pose with you and show you the proper alignment and tips for what to be aware of when doing each one.

When coming to the session, make sure you are dressed in (or have a change) of proper clothing to practice Yoga in. You want to be comfortable and not feel restricted in your clothing or limited in anyway. We have mats at the clinic, if you have your own and wish to use it, know that you are welcome to bring it with you. If you have Yoga props that you use regularly, feel free to bring these along as well (another way a Yoga session could be used is for learning proper use of props!)

If you have any questions about our Private Yoga Sessions or would like to speak to Allyson, please feel free to contact her at the office. You can do so by phone: 902-270-7022 or email: info@islandchiro.com

Allyson Lewis, RYT200hr is the Yoga instructor at Island Chiropractic & Family Wellness. She has completed her 200 hour Yoga Teacher Training and is offering Private Yoga Sessions and Yoga classes

Keep an eye out for an announcement soon with the dates and times of our 2019 Fall Exercise Class Schedule

Disclaimer - before participating in any activity that is new to you or you might not be aware if it is a right fit for you, please get permission from your health care provider. Private Yoga Sessions are not meant to treat or heal any ailment/illness or condition you may have.

Homemade Ice Cream - Recipe

Untitled design (3).png

Did you know that you can make ice cream at home without having to use an ice cream maker! Not only is it a healthier way to have ice cream (some call it “nice cream”) but you can also make what ever flavour you want, save money and involve the kids in the making process!

The base of this ice cream is made with bananas (no dairy here!). You can actually just make banana ice cream by chopping up a banana or two (or more depending on how many servings you want) freezing them and blending in a blender or food processor until it takes on the consistency of ice cream (approximately 3-5 minutes).

I have to admit, plain bananas is kind of boring (but good in a pinch when you don’t have much to add in), so here are a couple of options to make different flavours….

Mint-Dark Chocolate Chip Banana Ice Cream (a favourite of mine!)

  • 2 ripe bananas, sliced and frozen

  • 1/4 cup fresh mint (chopped)

  • 1/4 cup chopped organic dark chocolate

Chocolate Banana Ice Cream

  • 2 ripe bananas, sliced and frozen

  • 2 Tbsp organic cocoa powder

(optional - add in chopped chocolate or chopped nuts)

The directions are simple, make sure the banana is frozen, place all ingredients into food processor and blend (3-5 mins until smooth) If you want a more chunky texture add in half the ingredients and blend to get the flavour and then quickly blend the rest of the ingredients in to finish.

You can also store these in a glass storage container or a loaf pan. This is a great option if you are making a bigger batch and want to have some ready to go. Just store in the freezer and scoop out when needed.

Some other add-ins could be, any type of fruit, nuts, honey, spices (cinnamon, cardamom, etc) , any type of nut butter would work too (chocolate peanut butter banana ice cream sounds delicious!)

Give it a try and let us know what ice cream creations you came up with.

Enjoy !

Check out our recipe for the “perfect summer dipHERE

Strawberry Chia Jam

Looking for a healthier version of strawberry jam for all of those fresh local strawberries you have waiting to be used?

Check out this recipe for a refined sugar free, gelatin free & vegetarian (or vegan) friendly!

Strawberry Chia Jam:

Ingredients:

  • 2 cups Strawberries

  • 1 Tbsp Raw Honey (use maple syrup for vegan option)

  • 2 Tbsp Chia Seeds

Directions:

  1. Remove stems & wash strawberries

  2. Place all ingredients into blender/food processor. Pulse until you reach the desired consistency for your jam

  3. Put in sauce pan over medium heat until bubbling, reduce heat and let simmer for 10-15 minutes until it begins to thicken

  4. Remove from heat, pour into mason jar & let cool. Store in fridge for up to 7 days, if using later you can freeze it, just be sure to leave room at the top of the jar for expansion

  5. Enjoy !

Check out our Dairy Free, Gluten free “Cheesecake” recipe by clicking HERE.

Cape Breton Pride 2019

Pride week in Cape Breton is fast approaching (events start on August 2nd)

As you may already know, Island Chiropractic & Family Wellness is a sponsor for Pride Cape Breton this year and we have been selling our Rainbow Skeleton shirts to raise money for Pride CB. Our staff, family and friends will be at the parade this Saturday wearing our shirts with pride! We hope to see everyone who purchased a shirt sporting their’s at the parade (and anytime you wish!) as well.

Also, we would like to extend a very big thank you to everyone who supported our efforts by purchasing a shirt to help raise money for our local pride society, we are very grateful for the generosity of each and everyone of you.

Island Chiropractic is also hosting a Pride Yoga event on Wednesday, August 7th @ 5pm. The class will be held at Our Lady Of Fatima Church Hall (in the basement). This class will be lead by Jamie Crane and Allyson Lewis. The class will be a restorative style Yoga class with the option for participating on the mat or by using a chair.

This class is open to anyone and everyone who is looking to explore Yoga in a safe, accessible and welcoming environment.

Gratitude is $5 and will be donated to Pride Cape Breton.

We hope to see you all there. Have a safe and happy Pride Week everyone ! ! !

Salmon Tales and Tubes

IMG_6417.JPG

If you follow us on social media, you may have seen our river tubing post. This was such a great experience I wanted to post some details and some suggestions for those who may be interested in booking one of the trips!

Salmon Tales and Tubes is a program run through Parks Canada - you can find the link here.

As opposed to the other tubing experience in Cape Breton, this tour allowed us to bring our two and four year old. They do provide all the necessary gear, however, we were advised to bring our own lifejackets as they don’t carry the itty bitty ones.

If you are bringing anyone under the age of 5, I would also advise you to bring your own helmet as again, the sizes were too big for those little heads (we put their hats underneath the hemet and it seemed to work). We were advised that the hemet is more for protection against stray golf balls, as part of the river passes nearby the golf course.

Also, we recommend wearing water shoes.

There is a short walk up the river (about 45-minutes) where our guide Kirsten would stop and talk about the Salmon breeding habits and some of the challenges they are facing (did you know that 2019 is the year of the Salmon?). Kirsten also spoke about some of the trees in the area (and the issues they are facing with invasive species) and some of the local animals.

Once we got to our destination and were geared up, we all jumped aboard our tubes and were on our way floating down the river. The kids had an absolute blast.

Due to low water levels, there were some parts of the tour that we had to get off the tube and portage. Since it was such a hot day, we certainly didn’t mind the chance to cool down. I will caution you, you will get wet.

We started the tour at 3pm and everything was wrapped up just before 5:30pm.

If you are looking for something a little different to do and you have little ones, I highly recommend this tour!

The tour runs every Saturday until August 31st, and reservations are highly recommended - you can book it by calling 902-285-2535.


Jill's Homemade Granola

IMG_6122.jpg

Granola is a favourite food at our house; however, I always struggle with the added sugar content in most commercially bought granolas. Enter the DIY tip of the year from my friend Jill. Jill had posted online that she had made some granola and that’s when I realized that by making my own I could ensure it had all the goodness and none of the stuff I didn’t like (genius!). Here’s Jill’s recipe (with modifications). Also, realize that I usually don’t measure when I cook, so these are approximate amounts, feel free to add more/less according to your preferences.

Ingredients:

  • 2 Cups raw almonds

  • 2 Cups raw cashews

  • 2 Cups raw pecans

  • 2 Cups raw qalnuts

  • 2 Cups raw macadamia nuts

  • 1 Cup raw sunflower seeds

  • 1 Cup raw pumpkin seeds

  • 1 Cup shredded, unsweetened coconut

  • 1 Cup quick oats

  • 4 Tablespoons coconut oil

  • 2 Tablespoons almond oil

  • 2 Tablespoons raw/unpasteurized honey

  • Dash of cinnamon

  • Dash of vanilla

  • 2 Tablespoons water

Directions:

  1. Preheat oven to 350F

  2. Chop each nut group into bite sized pieces (you can use a blender on chop settings, but I find something about chopping nuts to be very satisfying)

  3. Spread out all nuts and oats on a large, parchment-lined baking sheet

  4. Bake nuts for 10 minutes

  5. While nuts are baking combine coconut oil, almond oil, honey, cinnamon, vanilla and water in a small saucepan and bring to a short boil. Remove from heat and wait for the nuts.

  6. Remove nuts from oven and place into a large mixing bowl (they will be hot!) and add oil mixture and combine well.

  7. Turn oven off

  8. Place mixture back onto baking sheet and put the back into the oven for 10-15 minutes - BUT watch carefully - depending on the heat in your oven, you may need to remove earlier than 15 minutes. They should be a nice golden colour when finished.

Enjoy!

We like to have our granola with full fat yogurt and berries on top. The added fat content from the yogurt keeps you satiated for a long time.

Like this granola recipe? Check out our “Cinnamon Maple Pumpkin Seeds” recipe by clicking HERE

Hacks for Camping with Kids

With summer in full swing, two camping trips under our belt (and hopefully a couple more to come!), we thought we would share some of our favourite hacks for when we camp with our kids.

Packing hacks:

  • Mid/Large Tupperware: We usually store our camping essentials, plates, foil, utensils, camp soap, dish cloths etc in a fairly large (but not deep tupperware) year round. When we get back from a trip, we replace what we’ve used and then it’s just a matter of throwing it in the car when it’s time to go!

  • Mid/Large Tupperware: We store our dry goods in one of these as well, anything that doesn’t need to be in the cooler will be packed inside one of these. Again a fairly large (but not too deep) is enough for us now. Also, the tupperware can be used for washing your dishes and even filling with water and letting the babies bathe near the campfire.

  • Camping for the first time? You can find a comprehensive list here thanks to lovetheoutdoors.com - We try to stay as minimal as possible when camping, so I’ll do a lot of my food prep the night before, which means things like a potato peeler (or pie iron) aren’t necessary to bring, since they are already washed/peeled (and who makes pie while they are camping?). Also, depending on the type of camping you are doing, you probably won’t need luxury items like a 5-gallon shower bag. With kids, we are typically car camping, which means most places have showers, so we would either take the kids for a shower, or bird bath in our tupperware container.

  • If you just got a new tent, try assembling it before hand to see how much effort is required. We just got a 6 person “North Face Kaiju” tent and so far so good! It’s very easy to assemble, we love the extra space, and the awning is great!

  • If you can find a hammock, bring it! We usually hang the hammock quite low to the ground and this has kept the kids entertained for anywhere from 2 to 20 minutes at a time.

  • Head lamps - our entire family has a head lamp - they allow you to have your hands free and the kids think they are really cool.

Cooler Hacks:

  • A frozen 2-litre water jug makes a great ice pack and when it thaws, you can use the water to drink.

  • We usually bring our metal water bottles and refill while on the go.

  • Meal prepping makes cooking much easier. Prepping small tin foil packs that can go right on the grill make life much easier.

  • We will usually bring a small soft sided cooler for any drinks, that way the cooler with the food can stay closed.

Traveling Hacks (for people with a 2 and 4 year old):

  • I will usually pick up a new colouring/sticker book for the kids to play with on the drive down, which may keep them occupied for anywhere from 2 to 20 minutes at a time.

  • We’ve started listening to kids stories on Spotify while driving. This has kept the kids happy and quiet for up to 2 hours at a time.

  • Another great trick to keeping them quite on the drive is popcorn! I’ll air pop some non GMO popcorn the night before and pack a couple reusable bags filled with popcorn (and a little butter) and they will happily (and quietly) munch for anywhere from 2 to 20 minutes at a time.

  • Despite a long day of activities and missing their regular bedtime, they are usually not that excited to sleep. They aren’t really interested in reading a book, so we will download a kids story on Spotify ahead of time and usually they calm right down and are asleep within 5-10 minutes.

  • We will usually try to find a campground either close to a beach or something that has a playground….. for obvious reasons (they rock!)

  • If you have packing space tricycles or bikes (and helmets) have been great entertainment at the campsite.

Meal Hacks:

  • We have a little portable stove that can be used to heat water and items in a small pan. It’s worthwhile to find out if your campsite has a fire pit with a grill or not - this will play a big part in what type of cooking items you bring along with you (stove, mini-stove, mini BBQ, etc)

  • Prep. The day before a camping trip, I like to prep all my veggies (wash and cut), fruits and foil meals. This makes them easy to pack and stack in the cooler and it also makes them easy to grab and go.

  • Pulled pork is a great pre-made meal that you can do a day or two before and then just bring in a reusable container. It’s easy to reheat and eat for breakfast, lunch or supper!

  • I’ve seen some people suggest you crack all your eggs, whisk them and then put them into a plastic bottle (see picture below). I’m not 100% sold on this idea, we usually keep our eggs in a carton in the cooler, it just seems like they would last a lot longer without being cracked ahead of time. Plus you can let your egg carton smoulder at the campsite to keep the bugs away!

  • These look amazing! Egg and cheese bread bowls - I’m trying them on our next trip.

  • Our kids love oatmeal, I always put a couple oatmeal cups in our dry goods bin for them

Not sure if camping is something your family could get into? Try an Otentik or equipped camping! Parks Canada had these great accommodations for people who aren’t quite set up for camping! Check them out here. The Otentiks are even heated - so you can usually get one early or late in the season and be comfortable. We’ve rented one early in May and later in September and it was awesome! Unfortunately, Otentik camping is not being offered in 2020 due to Covid-19… but keep them in mind for 2021!!

Worried about ticks? Check out this post on a new TICK Tracker by clicking HERE

The Perfect Summer Dip

Fresh Herb Cashew Dip.png

During the summer months quick food options always seem a lot more appealing as opposed to spending hours in the kitchen cooking.

The more ways you can find to have less prep for my food in the summer, the more time you get to spend enjoying summer (it is the shortest season in Cape Breton!)

I am a lover of quick and healthy finger foods. This dip takes very little time to make, is full of nutrients & minerals from the fresh herbs and also a good way to put that herb garden to use !!

Ingredients:

  • 1/4 cup raw cashews

  • 1/3 cup unsweetened almond milk (or cashew milk)

  • 1/2 cup fresh basil leaves

  • 1/4 cup fresh parsley

  • 2.5 Tbsp fresh squeezed lemon juice

  • 1 clove garlic

  • 2 Tbsp red onion

  • 1/4 tsp sea salt

Directions:

  1. Soak cashews in warm water (enough to cover them) for 30 mins - drain water off when ready

  2. Add all the ingredients into a food processor or blender - blend for 3 minutes or until smooth

  3. Serve with sliced veggies like cucumber, peppers celery, carrot sticks etc. Seed crackers pair well with this dip as well (I like Mary’s Crackers)

  4. Enjoy!

**In this recipe the nuts are only soaked for 30 minutes to help soften the nuts which helps with the consistency of the dip. If you want to soak the nuts to break down the phytic acid and neutralize enzymes to help with digestion/absorption I would recommend soaking the nuts in water for 7 hours before you use them with filtered water, along with 1/4 tsp sea salt.**

I hope you get a chance to try this recipe out, if you do, leave a comment and let me know how you liked it!

Digging this dip? Check out our “Simplified Caesar Salad” recipe by clicking HERE

More Omega-3's Please!

Omega-3s…something we hear a lot about that we should consume more of, but why?

Long ago the human species evolved on a diet high in omega-3 rich foods like wild salmon, game meat and different nuts and seeds. This is part of the reason (a large part) why the diseases of our time were basically non-existent during those times. Now a day’s we are consuming approximately 15 to 25 percent more omega-6 than omega-3, compared to when our ancestors consumed a 1:1 or 2:1 ratio. A lot of the omega-6 we consume now mainly comes from vegetable oils, these can be highly processed and rancid which can lead to the formation of free radicals in the body causing inflammation and disease.

So how can we incorporate more omega-3 into our diets?

There are many great foods for this, some mentioned above ( wild salmon, wild game meat, etc) but there is one that sticks out in my mind when it comes to getting in more omega-3’s and an all around “superfood” with no preparation needed.

Insert….the walnut!

Untitled design (2).png

Eating walnuts (along with a balanced diet) can have a very positive impact on your overall health and wellbeing. Walnuts are not only a great source of omega-3’s, they also contain high amounts of vitamins, minerals and antioxidants.

Walnuts are beneficial to brain health (have you ever noticed they kind of look like a human brain too?) - with mood boosting and cognitive benefits, heart health - improving circulation and has actually been found to reduce the formation arterial build up, they also help with controlling inflammation in within the body and are a great addition to your diet to help with balancing blood sugar (no more afternoon crash!). They are a known to be a calorie dense food, meaning its higher in calories for a smaller serving but you are consuming many essential vitamins, minerals and fats when eating it.

1/4 cup of walnuts (or 1 ounce , approximately 14 halves) eaten between meals or at the same time as a meal can help improve balancing blood sugar. Doing this can also help with overeating at meals or later in the day. Walnuts increase satiety and they are a great food to help curb cravings you may get for sugar or refined carbohydrates.

One last benefit about walnuts aside from the fact that they are a great source of omega-3’s I want to highlight is that, within this small serving of walnuts (mentioned above) you receive approximately 48% of your recommended daily adequate intake of manganese. This essential nutrient is involved in bone development, helps balance calcium levels and also when combined with other minerals such as calcium, zinc and copper - can help reduce bone loss. Combined with other supplements that help the joints (such as glucosamine) manganese can help reduce join inflammation in people with arthritis.

Some tips how to add these nutrient filled nuts into your daily life:

  • Always aim to buy raw and/or organic, unsalted nuts

  • Store them in an airtight container in the fridge, the oils in nuts when exposed to air can oxidize and become rancid

  • Eat them in between meals or with meals (as mentioned above)

    … and last but not least a little bit more “fun” way to enjoy them…

  • Walnuts pair great with dark chocolate! I shoot for at least an 80% coco (organic) chocolate, this will up the level of antioxidants and make it more of a treat for you to enjoy!

Add some walnuts to this amazing Granola recipe! Check out it out by clicking HERE!

Everybody Should Be Resistance Training

A coupe of weeks ago for our quick tip Tuesday on Instagram we talked about one of the Canadian Society for Exercise Physiology (CSEP) physical activity guidelines recommending 150 minutes of aerobic activity per week.  Most people know about the benefits of aerobic activity.  However, quite often resistance training or strength training is overlooked.  CSEP does say “It is… beneficial to add muscle and bone strengthening activities using major muscle groups, at least 2 days per week.” This is where resistance training comes in.  

Muscle mass and strength has high predictive value of all cause mortality.  Resistance training helps strengthen bone, muscle, tendon, and ligaments. It improves metabolic and cardiovascular health. Increased muscle mass elevates basal metabolic rate (BMR) as lean muscles require calories to maintain themselves at rest.  In this manner simply having lean muscle can burn fat. 

Being strong improves quality of life and mitigate injuries.  Resistance training can help prevent osteoporosis and falls in older people.  Physical activity improves mental health and mood. Of course increasing muscle mass and strength improves physical attractiveness, self esteem, and body image.  

CSEP recommends “at least 2 days per week”.  I think this is a great minimum and could be achieved in 20 - 30 minutes of intense full body movements that hit major muscle groups.  If you’re just beginning you could start with bodyweight exercises like squats, push ups, pull ups, bridges, planks, crawls or easier modifications of these.  Bodyweight exercises may be enough for some people to reach their goals.  Others may want to progress to lifting heavy things like rocks in the back yard, dumbbells, kettlebells, or barbells.  Again I like to focus on compound movements like deadlifts, squats, bench press, overhead press, rows and carries.  Pick two or three exercises and perform three to five sets with three to ten reps.  Theres no hard rules on this except don’t get hurt.  Practice quality of movement, be patient, and progress slowly to allow your body to adapt.  

Keep in mind lean muscle weighs more than fat tissue.  So if strength training is part of a weight loss strategy - you may be improving body composition but the scale may not be going down. In this case consider a different out come measure like waist to hip ratio or waist to height ratio.  Also, you may take a picture of yourself in you bathing suit and compare.  Probably the best gauge of improvement is as Robb Wolf would say, “how do you look, feel, and perform?”

I’ll leave you with a blunt but fitting quote from strength coach Mark Rippetoe - “Strong people are harder to kill than weak people and more useful in general.” 

Simplified Caesar Salad Dressing

Finally, we are having some nice weather to enjoy all the summer things like barbecues and socials with friends and family. So, you know what that means…lots of salads loaded with store bought salad dressing!

Here are some reasons why you should ditch the bottled dressings and spend an extra 5 minutes making your own:

  • They are full of artificial flavours

  • They contain unnecessary sugars (like high-fructose corn syrup…who needs that on a salad… or ever?)

  • Bottled dressings are also made with tons of preservatives to prolong their shelf life … ever wonder why they don’t expire for 2 years?

  • These types of dressings are also loaded with trans-fat (the bad kind of fat!)

 All that being said, there are some bottled dressings you can buy with some clean ingredients and lower on the preservative side (these can be pretty pricey for a bottle though). The bigger picture here is that if you are making a dressing from scratch it’s going to 1. Taste better not only because its super fresh but also because you made it yourself (isn’t that always the way!) 2.  You don’t have to have 10 bottles of half used dressing in your fridge for years and years and years…you get the point. If you make your own, you can make as much as you need and there is no waste! 3. You can control the ingredients you put in your dressing, if there are any dietary restrictions or allergies this is the perfect way to know exactly what you are getting!

 The recipe for this salad dressing is a Caesar style dressing, its light, healthy and full of flavour!

 Caesar Salad Dressing:

Ingredients:

1/3 cup plain Greek yogurt

1 clove of Garlic

2 tablespoons Apple Cider Vinegar

1 tablespoon Tamari (or coconut aminos)

1 tablespoon Extra Virgin Olive Oil

1 tsp Dijon Mustard (I like to use an organic brand and make sure it is free of canola oil)

Sea Salt & Pepper to taste!

Directions:

Put all ingredients in a food processor, blend until smooth. You can also use an immersion blender or even a regular blender! If you don’t have any of those, make sure the garlic is minced well and whisk all ingredients together and let stand for a few minutes before using to make sure all the flavours come together.

Enjoy & happy BBQ’ing!

Like this dressing? Check out our “Perfect summer dip” recipe by clicking HERE.

Private Yoga Tune-up

As chiropractors we treat a lot of back pain. Over the years, we have observed that some of our patients enjoy the benefits of a Yoga practice in their lives, but they are frequently bothered by a chronic pain that seems to be worse on Yoga days. There are many benefits to having a strong Yoga practice but, did you know that sometimes Yoga could be the source of your pain? There are certain spinal conditions that could potentially become aggravated with various Yoga poses. We’ve even seen patients who’s recovery was limited because of their Yoga practice.

During a Yoga class do you find yourself wondering if you are correctly holding the pose?

Do you have a home practice or follow an instructor online, but aren’t sure if you are in proper alignment?

Are you intimidated by large classes but would like to try Yoga?

We are excited to announce that Allyson Lewis will now be offering one-on-one private sessions. It doesn’t matter if you are a seasoned Yogi or beginner, your session with Allyson will cover all concerns or questions that you may have. These classes will focus on proper alignment and breathing techniques during various poses. Your session will also include a specific, personalized routine that will address your needs.

Sessions are 45-minutes in length and are $55. You can add on a consultation with one of the doctors to address any aches and pains that you have as well.

Space is limited, call 902-270-7022 or click HERE to book!

~ Namaste ~

110% Awesome Cookies

Paleo, Gluten Free, Dairy Free 110% AWESOME Cookies!

I’ve been struggling to find a decent recipe for a “healthier” cookie. Usually modifications to recipes in the attempt of making them a little “healthier” don’t turn out very well. But this time I’ve hit the jackpot! These cookies are not only ridiculously delicious, but they are decent in protein, fibre, vitamin E, vitamin C, iron, magnesium and potassium! Needless to say, they did not last long at our house!

Ingredients:

  • 1 Cup Dates

  • 1 Cup Ras Cashews

  • 1 Large Egg

  • 1 Tsp Vanilla Extract

  • 1/4 Cup Almond Flour

  • 1/4 Tsp Baking Soda

  • 1/4 Tsp Salt

  • 1/4 Cup Chopped Almonds

  • 1/4 Cup Chopped Macadamia Nuts

  • 1/4 Cup Unsweetened Coconut Flakes

  • *Optional 1/4 Cup 70% Dark Chocolate Chunks

Instructions

  1. Soak cashews and dates in boiling hot water for 5 minutes.

  2. Preheat oven to 350 F.

  3. Chop almonds and macadamia nuts and set aside in medium sized bowl.

  4. Remove dates and cashews from water, shake dry and pulse in bender till chopped/mixed well.

  5. Add egg, vanilla, coconut flour, baking soda and salt into blender and process until barely chunky.

  6. Add mixture into bowl with almonds and macadamia nuts, add coconut flakes mix well.

  7. *Optional add in - add dark chocolate chunks to mixture (our little guy does not like chocolate, so I divided the mixture into two and then added chocolate to half).

  8. Place table spoon sized portions onto parchment lined baking sheet, about 1 inch apart. Gently pat down, these cookies do not spread at all.

  9. Bake fore 11-12 minutes. Removing from oven, letting the cookies stay on the baking sheet for 2 minutes before transferring.

Do you have a bit of a sweet tooth? Check out our “Chocolate Zucchini Blender Muffins” by clicking HERE

Rainbow Skeleton Shirts for PRIDE CB

Rainbow Skeleton Shirts in support of Pride Cape Breton

White, 100% cotton T-shirt with Rainbow Throax on front, blank on the back.

Shirts are $20.00 ($3.00 extra for mail orders)

$5.00 of every sale goes to PRIDE Cape Breton

100% Cotton T-shirt

Kids Sizes

  • 2-4 (Width 14 inches) (Length 18 inches)

  • 4-6 (Width 16 inches) (Length 20 inches)

  • 6-8 (Width 17 inches) (Length 22 inches)

  • 10-12 (Width 19) (Length 26 inches)

Adult Sizes

  • Small (Width 18 inches) (Length 28 inches)

  • Medium (Width 20 inches) (Length 29 inches)

  • Large (Width 22 inches) (Length 30 inches)

  • X-Large (Width 24) (Length 31 inches)

Come into the office to get yours while supplies last!

Give us a call if you would like to place a mail order. 902-270-7022.